
Right now, your fingers probably know how to find the letters on your phone keyboard without you thinking about it. Touch typing works the same way — except on a full keyboard, with all ten fingers doing the work instead of two thumbs. Once your hands learn the layout, you stop hunting for keys and start typing at the speed you think.
If you’re currently a hunt-and-peck typist — looking down, using two or three fingers, glancing back up to check what you typed — this guide will walk you through exactly how to switch over. No paid software, no gimmicks. Just the home row, a finger map, a practice plan, and an honest look at the slow patch almost everyone hits in week two.
What Is Touch Typing?
Touch typing is typing by feel instead of by sight. Each finger is assigned a fixed set of keys, and instead of scanning the keyboard to find each letter, your fingers move there automatically because they’ve done it hundreds of times before. Your eyes stay on the screen the entire time.
This isn’t a new invention. The technique dates back to the 1880s, when typists on early mechanical typewriters realized that memorizing finger positions was faster than looking at the keys — especially since many early machines didn’t let you see what you’d typed until you finished the line anyway. The home row layout you’ll learn below is basically unchanged since then, over 140 years later, because it still works.
| Hunt-and-Peck | Touch Typing | |
| Fingers used | 2–4 fingers | All 10 fingers |
| Eyes | Constantly checking the keyboard | Stay on the screen |
| Realistic speed ceiling | ~35–45 WPM, regardless of years of practice | 60–90+ WPM with consistent practice |
| How it improves over time | Plateaus early — the method itself has a ceiling | Keeps improving as muscle memory strengthens |
Quick Self-Check: Are You Already Touch Typing?
Before you start from scratch, find out where you actually stand. Answer honestly:
- Do you look at the keyboard for more than a few keys per sentence?
- Do you use fewer than 6 fingers regularly?
- Do your hands wander around the keyboard instead of returning to one spot?
- Have you never checked your actual typing speed?
If you answered yes to two or more, you’re a hunt-and-peck typist — and this guide is exactly for you. If you answered yes to none, you may already be close to touch typing; run a quick
baseline test on our typing test before you decide whether this guide is still worth your time.
The Home Row: Your Starting Position
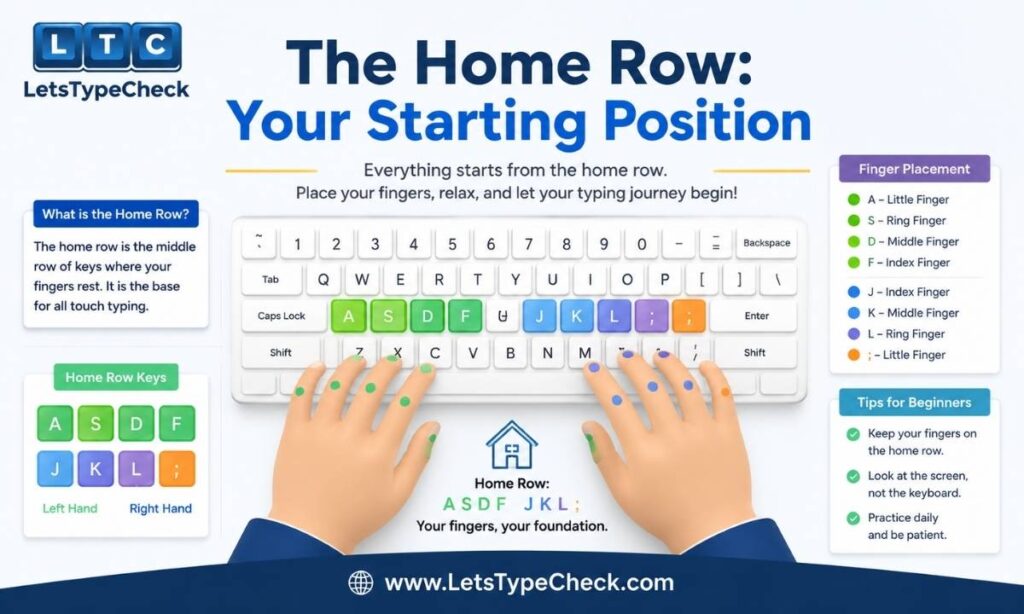
Every touch typist starts in the same place: the home row. This is the middle row of letters on a standard keyboard, and it’s where your fingers rest between every keystroke.
- Left hand: pinky on A, ring finger on S, middle finger on D, index finger on F
- Right hand: index finger on J, middle finger on K, ring finger on L, pinky on the semicolon (;)
- Both thumbs rest lightly on the space bar
Feel the F and J keys with your index fingers — you should notice a small raised ridge on each one. Those bumps exist purely so you can find your starting position by touch, without ever looking down. Whenever your hands drift off-course mid-sentence, touching F and J resets you instantly.
Full Finger-to-Key Map
Once your hands are anchored on the home row, every other key on the keyboard belongs to one specific finger. Here’s the full breakdown:
| Finger | Keys it’s responsible for |
| Left pinky | Q, A, Z, Tab, Caps Lock, Left Shift, 1 |
| Left ring | W, S, X, 2 |
| Left middle | E, D, C, 3 |
| Left index | R, F, V, T, G, B, 4, 5 |
| Right index | Y, H, N, U, J, M, 6, 7 |
| Right middle | I, K, comma, 8 |
| Right ring | O, L, period, 9 |
| Right pinky | P, semicolon, slash, Enter, Right Shift, 0 |
| Both thumbs | Space bar |
The three keys almost everyone gets wrong at first: G and B belong to the left index finger, and H belongs to the right index finger — not whichever hand feels closer. Fix this in your first few days, because once it becomes a habit, it’s genuinely hard to unlearn.
Day 1: Your First 10 Minutes
You don’t need a plan for the next month yet — you need to know what to do in the next ten minutes. Here’s exactly that:
- Minute 1–2: Sit up, screen at eye level, elbows roughly at 90 degrees. Rest your fingers on the home row and find the F and J bumps without looking.
- Minute 3–6: Type this pattern slowly, over and over, keeping your eyes on the screen: asdf jkl; asdf jkl; fdsa ;lkj. Don’t worry about speed — just get each finger returning to its own key.
- Minute 7–9: Type simple home-row-only words: dad, sad, ask, flask, glass, fall, lads, salads.
- Minute 10: Stop. Note how it felt. That’s your entire first session — repeating this for a few days is more valuable than rushing ahead.
The Step-by-Step Learning Plan
Once Day 1 feels familiar, move through the keyboard in stages rather than trying to learn everything at once:
- Days 1–3 — Home row only (A S D F, J K L ;). Goal: place every finger correctly without looking.
- Days 4–7 — Add the top row (Q W E R T Y U I O P). Practice reaching up and immediately returning to home position.
- Days 8–11 — Add the bottom row (Z X C V B N M) plus Shift for capitals.
- Days 12–16 — Add numbers and common symbols.
- Day 17 onward — Full sentences and paragraphs, gradually building speed on top of accuracy that’s already solid.
For the accuracy-first stage, keep sessions short — a 30-second test is long enough to check your home-row accuracy without inviting fatigue-driven mistakes.
Practice Drills for Each Stage
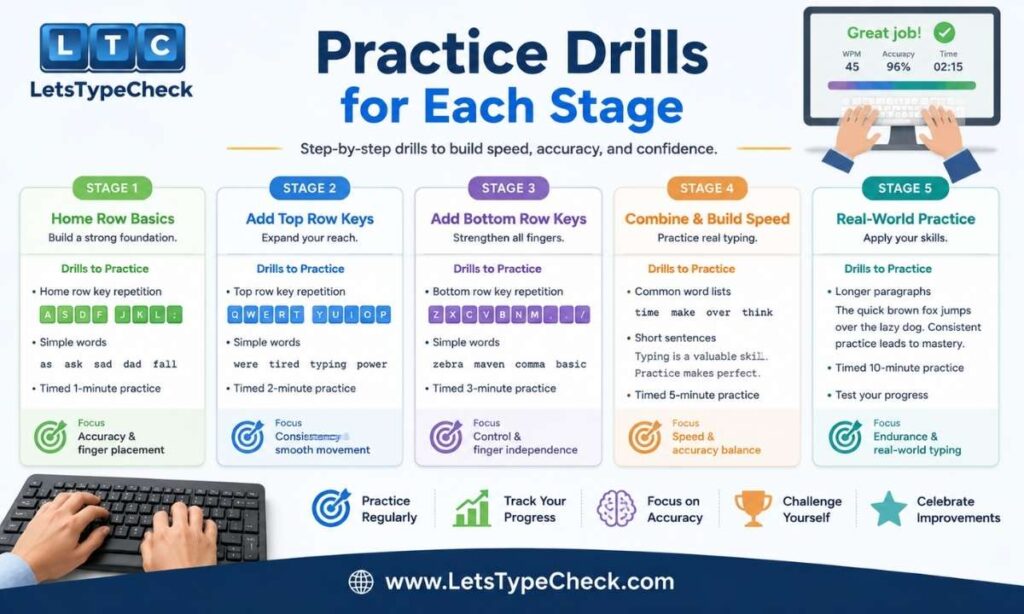
Drilling in isolation only gets you so far — at some point you need timed, structured practice that mirrors real typing conditions. Here’s how to match each learning stage to a practice length:
- Home row stage: short, frequent sessions. A 30-second test is ideal — long enough to build the habit, short enough that fatigue doesn’t wreck your form.
- Full-alphabet stage: once you’re comfortable with all three rows, move to a 1-minute test to see your baseline WPM honestly.
- Speed-building stage: once your accuracy sits above 95%, a 2-minute test adds enough length to reveal where your rhythm breaks down on longer passages.
- Difficulty progression: as your fingers stop hesitating, move from Easy text (simple, common words) up through Medium and eventually Hard mode, which introduces longer words and more complex sentence structure — a good stress test for whether your muscle memory actually holds up.
Start here: our typing test lets you pick your duration and difficulty directly, so you can match the test to whichever stage you’re on. When you’re ready to push past the basics, Hard mode is a useful benchmark for how far your technique has actually come.
Common Mistakes That Slow Beginners Down
- Looking at the keyboard — every glance reinforces visual memory instead of muscle memory. A cloth over your hands for the first week or two removes the temptation entirely.
- Chasing speed before accuracy — typing fast with the wrong fingers locks in the wrong habits, which are harder to unlearn than to build correctly the first time.
- Skipping the return to home row — if your fingers stay wherever they land instead of snapping back, every next keystroke starts from the wrong position.
- Practicing in long, irregular sessions — 15 minutes daily builds muscle memory faster than two hours once a week. Motor skills consolidate during sleep, so consistency matters more than session length.
- Using the wrong finger for G, B, and H — the single most common finger-map error, and the easiest one to fix early.
Why Your Speed Might Drop First (The Productivity Dip)
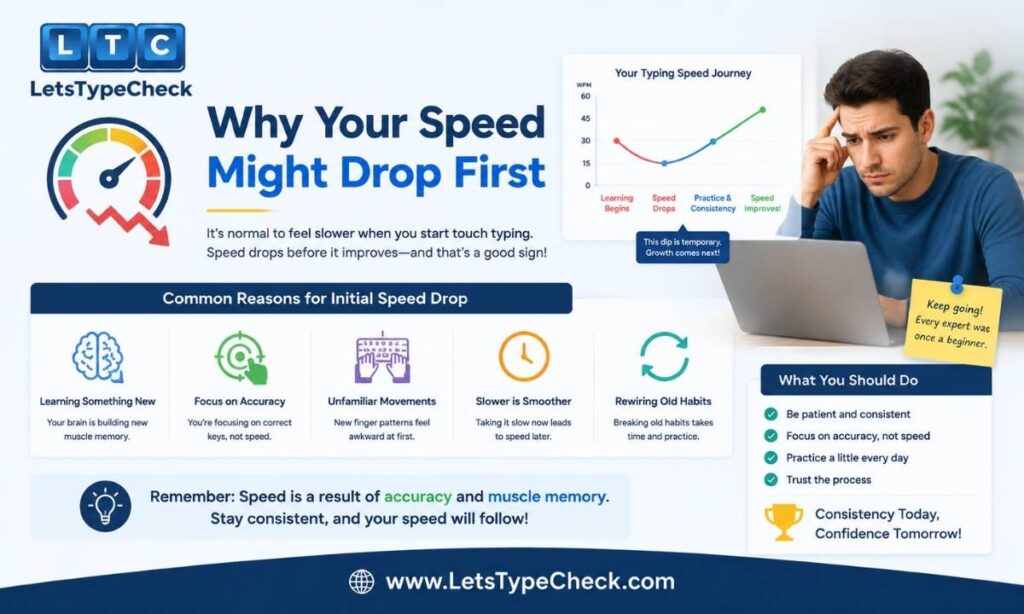
If you’re switching from an existing hunt-and-peck habit rather than starting from zero, expect a temporary step backward. You already have years of muscle memory built around your old two-finger method, and for a few weeks your brain will be running two competing systems — the old reflex and the new one you’re building.
This dip typically lasts three to five weeks and is not a sign you’re doing something wrong. It’s the predictable cost of replacing an old habit with a better one. The people who give up almost always quit during this exact window — right before the new movements would have become automatic. Keep a separate window open for anything that genuinely needs your old speed, and treat touch typing practice as its own dedicated session until the dip passes.
Stuck? Fixing a Typing Plateau
A dip in week two or three is normal. A flat line for three or more consecutive weeks after that usually points to one of a few specific causes:
- You’re still glancing at the keyboard under pressure. Test yourself deliberately by typing a sentence with your eyes closed for the last few words — if you can’t finish it, the visual habit hasn’t fully broken yet.
- You’re testing too often and too competitively. Daily testing under pressure can reinforce panic-typing instead of clean technique. Drop back to untimed practice for a few days, then retest.
- Your accuracy is quietly below 95%, even if it doesn’t feel that way. Low accuracy caps your effective speed no matter how fast your fingers move, because every correction costs more time than typing the key correctly the first time would have.
- You’ve outgrown Easy-difficulty text. If the words you’re practicing on have become too predictable, your fingers stop building new pathways. Stepping up to Medium or Hard difficulty reintroduces the challenge your hands need to keep progressing.
Compare your numbers against realistic milestones for your stage using our WPM benchmarks by age — a flat line can look alarming in isolation but be completely normal once you see where you actually sit relative to others at the same stage.
Posture & Ergonomics for Sustainable Practice
Technique and posture aren’t separate concerns — bad posture undermines finger placement even when you’ve memorized the map correctly. A few fixed points matter most:
- Screen at eye level, so you’re not tilting your neck down to read
- Elbows at roughly 90 degrees, close to your body rather than reaching forward
- Wrists hovering just above the keyboard, not resting flat on the desk — resting them anchors your hands and limits reach, forcing your fingers to compensate with awkward stretches
- Feet flat on the floor, back supported, shoulders relaxed rather than hunched toward the keyboard
None of this needs to be perfect from day one, but sessions where your wrists are resting flat or your neck is craned tend to produce sloppier finger returns to the home row — which slows down exactly the habit you’re trying to build.
Touch Typing for Numbers, Symbols, and Code
If your goal is programming, data entry, or any work involving frequent numbers and symbols, the number row deserves deliberate practice rather than an afterthought. The number row sits two rows above the home row, which makes it the longest reach on the keyboard — and the one most beginners rush through.
- The left index finger stretches for 4 and 5; the right index finger stretches for 6 and 7 — the same fingers that already cover the widest zone on the home row.
- For programmers, symbols like brackets, semicolons, and underscores appear far more often than they do in ordinary prose, so it’s worth practicing code-style text specifically rather than assuming general fluency will transfer automatically.
- For data entry roles, speed on the number row specifically — independent of your general WPM — is often what’s actually being tested, so isolate it in practice rather than folding it into general sentence drills.
3 Myths About Touch Typing, Debunked
Myth 1: “You need paid software or a special course.”
The technique itself is just a finger map and consistent practice. Structured courses can add convenience, but nothing about touch typing requires payment — free typing tests and basic drills cover everything the fundamentals need.
Myth 2: “It’s too late to learn as an adult.”
Adults don’t learn touch typing meaningfully slower than teenagers — the real obstacle is unlearning an existing hunt-and-peck habit, not age itself. Someone starting from zero often has an easier time than someone breaking a 20-year-old habit, simply because there’s no old reflex competing for control.
Myth 3: “It’s only useful for typists, secretaries, or writers.”
Anyone who spends real time at a keyboard benefits — students, programmers, customer support agents, remote workers answering messages all day. The less mental energy you spend locating keys, the more you have left for the actual thinking your work requires.
How to Know You’ve “Graduated”
There’s no single WPM number that marks the finish line, but a few signs reliably indicate that the foundational phase is behind you:
- You can type a full paragraph without glancing at the keyboard even once, including numbers and punctuation
- Your accuracy sits consistently above 95%, even under mild time pressure
- Your speed on Medium or Hard difficulty text is no longer dramatically lower than on Easy text
- You’ve stopped consciously thinking about which finger to use — it simply happens
Once you hit that point, the goal shifts from learning the mechanics to building raw speed. That’s a different phase with different techniques — see how to type faster for what comes next.
Benefits of Touch Typing
- Higher sustainable speed — touch typists regularly reach 60–90+ WPM, well past the ceiling hunt-and-peck typing imposes
- Fewer errors — muscle memory is more consistent than visual searching, especially over long typing sessions
- Less physical fatigue — spreading the workload across all ten fingers instead of two or three reduces strain during long sessions
- More mental bandwidth — when your fingers know where to go automatically, your attention goes entirely to what you’re writing, not where the letters are
- A durable, one-time investment — once the muscle memory is built, it doesn’t fade the way unused knowledge does
To see where your numbers should realistically land as you improve, check what counts as a good typing speed for benchmarks by job, age, and experience level.
FAQs
How long does it actually take to learn touch typing?
Most beginners can type simple home-row words without looking within the first few days. Full keyboard fluency — where you stop looking entirely, including for numbers and symbols — typically takes four to eight weeks of short daily practice. Reaching a comfortable working speed of 50–60+ WPM usually takes two to four months from a standing start.
Is it too late to learn touch typing as an adult?
No. The learning curve for adults isn’t meaningfully steeper than for teenagers. What actually slows adults down is unlearning an existing hunt-and-peck habit — someone starting from complete scratch often progresses just as fast, sometimes faster.
Why do the F and J keys have bumps?
They’re tactile anchors so your index fingers can find the home row by feel, without ever looking down. Whenever your hands drift off-position mid-sentence, touching F and J resets you instantly.
Should I cover my keyboard while practicing?
It helps many beginners in the first one to two weeks, when the habit of glancing down is strongest. A cloth or blank keycap set removes the option entirely. Most people no longer need it by week three.
Is it normal for my typing speed to drop when I start touch typing?
Yes, especially if you’re switching from an existing hunt-and-peck habit. A temporary dip lasting a few weeks is the expected cost of replacing an old motor pattern with a new one — not a sign that something has gone wrong.
What’s a realistic beginner speed goal?
Aim for 30–40 WPM with at least 95% accuracy as your first real milestone. That range confirms your fundamental muscle memory is solid; raw speed becomes much easier to build from there.
Do I need to learn number and symbol keys right away?
Not immediately. Build solid accuracy on the alphabet first, then add numbers and symbols once your hand returns to the home row automatically. Trying to learn everything simultaneously usually slows overall progress.
How do I know when I’ve finished learning and should just focus on speed?
When you can type full paragraphs — including punctuation and numbers — without glancing down, and your accuracy holds above 95% even under mild time pressure, you’ve moved past the learning phase. From there, speed-building techniques take over.
The Bottom Line
Touch typing isn’t a talent some people have and others don’t — it’s a mechanical skill built through repetition, the same way learning any physical movement works. Start with the home row, move through the keyboard in stages, expect a temporary slowdown if you’re breaking an old habit, and measure your progress honestly rather than by how fast a single session felt.
When you’re ready to check where you stand, take a free typing test and pick the difficulty that matches your current stage — or, if you’d rather start with a structured beginner path, see our typing test for beginners guide.